Interesting Tech Projects
Linux

PCB For Raspberry Pi WH1080 Weather Station
Nov 15th
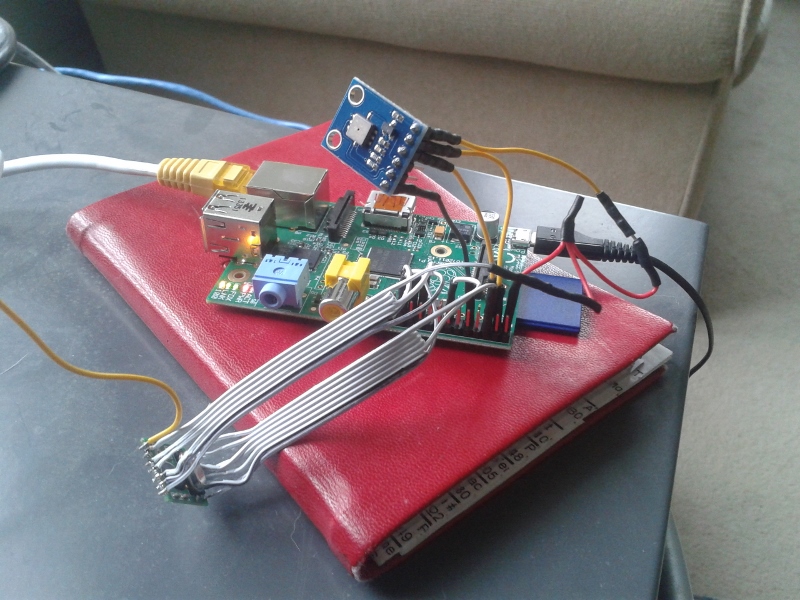
Previously I wrote about using a Raspberry Pi to receive 433MHz signals from a WH1080 weather station. This is the mess of wiring I came up with:
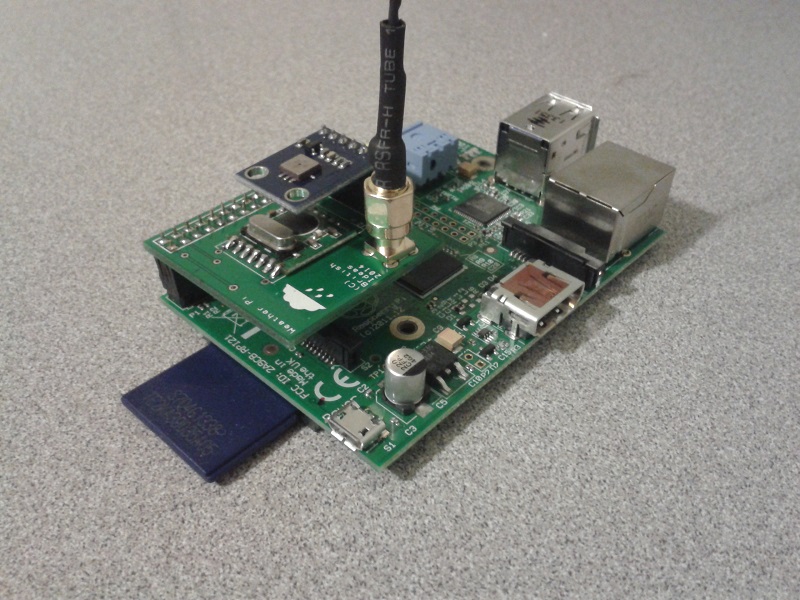
This worked fine until it stopped. I probably didn’t crimp a wire properly and too many knocks resulted in unreliable operation. To solve this I designed a PCB that connects the radio receiver, pressure sensor and an antenna to a Raspberry Pi:
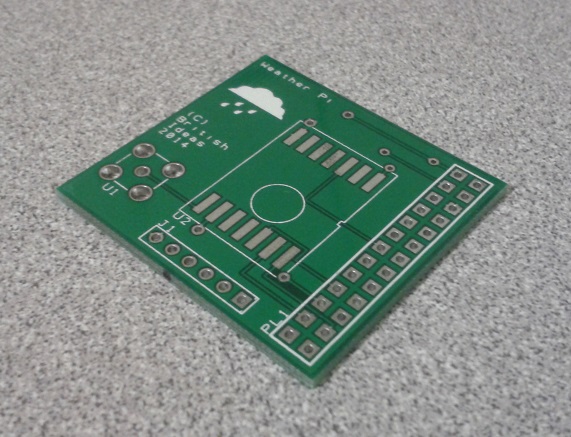
The design is very simple:
It accepts a surface-mount version of the RMF01 module (the version with a black resin blob). This is easily soldered onto the PCB by hand.
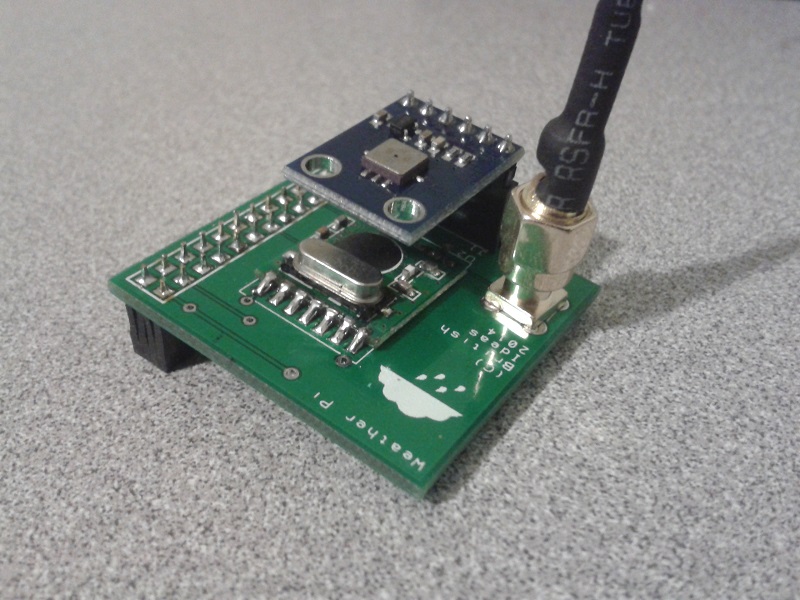
A female through-hole SMA connector is used for the antenna connection. This allows a range of off-the-shelf antennas to be used. The one I purchased from eBay didn’t work so I modified it as can be seen in the pictures. Alternatively a wire can be directly soldered to the board.
Finally a six pin BMP085 module is connected to a header. The pinout of the BMP085 module used is:
- Pin 1 = 3.3V
- Pin 2 = SDA
- Pin 3 = SCL
- Pin 4 = No connection
- Pin 5 = No connection
- Pin 6 = Ground
Here is how the PCB looks when populated:
Download the schematic diagram (15MB).
I have some spare boards, so if you would like one to experiment with please contact me.
Update: All the spare boards are gone. I hope everyone who received one has a lot of fun with them!
Here are the gerber files, suitable for submitting to a PCB house. The license is CC-BY-NC SA. I.e. for personal non-commercial use only. Sorry, but I am unable to provide support for these files.

WH1080 Weather Station Wind Vane
Jun 10th
I think the jury is still out on the wind vane that comes with WH1080 weather stations (e.g. Fine Offset, Mapin). Some people claim it works fine when placed high up away from any buildings, trees or other obstructions. Many people complain that it is just not reliable regardless. It doesn’t help that the weather stations come with a short pole.
From watching the vane it seems one of the issues is when the wind is gusty. I’ve noticed that when a gust ends the vane becomes destabilized and simply spins around and around.
For me it is simply not feasible to locate the vane on the chimney so I wondered if adding software filtering to my weather station code might work.
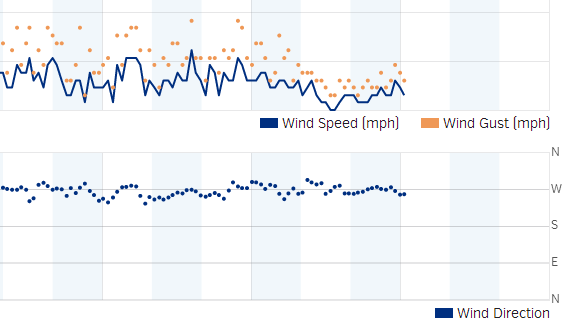
pywws already contains wind direction averaging for hourly summaries so I thought it would give that a try. Here is how the wind direction data looked a few days ago before adding averaging to the code:
 The top part shows the wind speed and gusts. The bottom shows the wind direction. As you can see it is hard to see any pattern beyond the wind coming from the south, east or north.
Here is the wind direction data today after adding the averaging:
Much better. It is clear the wind was coming out of the west. While the above data was being captured I could see the vane swinging from north to south all the time, so it is pretty nice that the averaging was able to pick out the correct wind direction.
As previously mentioned the algorithm was taken from pywws, but with a couple of changes added. It works as follows:
- When the receiver starts it collects a new wind vector every 48 seconds. The vector consists of the wind direction and average speed. This comes directly from the weather station transmitter.
- While the receiver is collecting the first 16 wind vectors it reports the current wind direction to Weather Underground. So for the first 12.8 minutes (16 x 48 seconds) after reset the wind direction is not averaged.
- Once 16 wind vectors have been collected the receiver starts averaging the wind direction and reporting the average to Weather Underground. Every 48 seconds when new data is received the oldest wind vector is overwritten. So the receiver always has the last 16 wind vectors to work with.
- The latest 16 wind vectors are converted into weighted vectors. There is one vector for each compass point direction and the size of each vector is the sum of the average wind speeds measured coming from that direction. This method ensures the result favors directions where stronger winds came from.
- Using some trigonometry the average wind direction is calculated.
- In the situation where there is no wind for all 16 wind vectors (so no wind for 12.8 minutes) then the last average wind direction is used.
The code can be obtained from github.

WH1080 Weather Station and Weather Underground
Jun 7th
A couple of years ago I bought a WH1080 weather station (e.g. Fine Offset, Mapin). It’s available under many brands from many outlets all over the world and is very common. Here are pictures of what this cheap weather station looks like:

I had the touchscreen connected to a Linux sever via USB and used pywws to upload to Weather Underground. This worked well until USB broke so I had to look for a new solution.
Kevin Sangeelee had developed some code that allowed a Raspberry Pi to receive the 433MHz radio signals and decode them. It also had support for a pressure sensor. Perfect. The code can be found here: http://www.susa.net/wordpress/2012/08/raspberry-pi-reading-wh1081-weather-sensors-using-an-rfm01-and-rfm12b/
The RFM01 was obtained from Maplin for about £4 and was trivially connected to the RPi. Kevin’s article gives the connections. Note: I didn’t use any resistors.
The BMP085 was also easily connected. Purchased from eBay for about £6 it connects directly to the I2C pins. Again, no resistors needed.
The first step was up update Kevin’s code for revision 2 of the RPi. This is required because a GPIO pin has changed and the second I2C bus is now used.
Now I ran into a stumbling block – how to get the data into pywws. I hoped that this problem had already been solved but unfortunately I would have to start writing custom python modules. After thinking about it for a while I decided that all I needed was to upload data to Weather Underground. I didn’t need the other features of pywws. Fortunately Weather Underground has a simple way of uploading using a HTTP GET request. The data just needed to be massaged into the correct format. While I was at it I decided to use the rapid-fire updating. This means that Weather Underground displays new data from your station roughly every 48 seconds – you can watch it continually update.
You can get the code from GitHub here: https://github.com/ajayre/WH1080-Weather-Underground.
Create a text file in the same folder as the executable called wunderground_creds.txt. On the first line enter the name of your weather station ID, for example IWESTYORKS30. On the second line enter your Weather Underground password.
Compile, run and follow Kevin’s instructions for setting up and tuning. Don’t forget to enable the SPI and I2C modules on the RPi. Also make sure you run:
sudo dpkg-reconfigure tzdata
to set the timezone.
Make sure the path to the credentials file in wunderground.c is set correctly. To start the program on boot I used the following in a boot script:
sudo screen -d -m /home/pi/weather/wh1080_rf

Setting up Raspberry Pi for 3D Printing with RepRap
Sep 29th
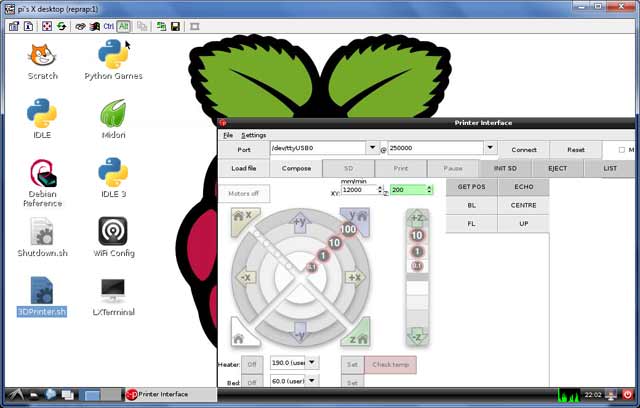
Having a 3D printer is cool, but requires a PC to be attached to it for control and monitoring (things like jogging, setting temperatures and even sending the gcode). Wouldn’t it be nice if the PC was a small circuit board attached to the printer making it a compact all-in-one solution? Here is how to use a Raspberry Pi $25 PC to do exactly that!
Goals:
- Use VNC to remotely view the desktop on the Raspberry Pi
- There are two scripts on the desktop – starting pronterface and shutting down.
- gcode files on a server are automatically available on every boot
- 250000 baud works fine
- Set up without connecting a TV, keyboard or mouse
1. Download the current version of Raspian. Beginning sometime in September an important USB problem was solved. I used the September 18th version and it works fine.
2. Download an application to copy the image file to an SD card. I used Win32DiskImager along with an 8GB SDHC SanDisk card. A fast card is important.
3. Insert the SD card into the Raspberry Pi, attach to a wall-wart USB power source, connect an ethernet cable and turn on the power.
The LEDs will turn on and flash a lot. The boot process should finish after a couple of minutes.
Now you have to find out the IP address that has been assigned to the Raspberry Pi. Probably the easiest way is to log into your router and look at the connected devices. If your router is like mine then it shows “raspberry pi” as the device name and clicking on it gives the IP address.
Next connect using a SSH terminal application. I recommend PuTTY. Enter the IP address and log in with username “pi” and password “raspberry”. Then enter:
sudo apt-get update
sudo apt-get dist-upgrade
sudo apt-get install git-core
sudo wget http://goo.gl/1BOfJ -O /usr/bin/rpi-update && sudo chmod +x /usr/bin/rpi-update
sudo rpi-update
sudo reboot
After the reboot log back in and:
sudo apt-get install tightvncserver
tightvncserver
vncserver :1 -geometry 1024x728 -depth 24
When prompted for a password enter what you want to use to protect access to the printer. For example I used “reprap”.
Test you can connect and view the desktop by installing TightVNC on your PC and connecting using the IP address with “:1” after it. For example my Raspberry Pi was at 192.168.1.150:1.
Follow the instructions given here to assign a static IP address and start the TightVNC server on boot. Test by rebooting and connecting using TightVNC.
You can edit /etc/hostname and /etc/hosts to change the name from raspberrypi to something like reprap, if you desire.
Create a script on the desktop to shut down the Raspberry Pi when it is double-clicked:
cd ~/Desktop
touch Shutdown.sh
chmod 777 Shutdown.sh
nano -w Shutdown.sh
Enter into it:
#!/bin/bash
shutdown -h now
Test that double-clicking on the file and choosing “Execute” causes the Raspberry Pi to shut down.
Add the user pi to the dialout group so that the USB serial ports can be used:
sudo usermod -G dialout pi
Expand the filesystem to use the entire SD card:
sudo raspi-config
Choose the item from the menu to expand the root partition.
Run raspi-config again and choose the overclocking option and select a faster speed. Currently I’m not sure which are unreliable (if any!).
Download printrun and put it somewhere useful, for example /home/pi/3DPrinting.
Install the dependencies for printrun:
sudo apt-get install python-serial python-wxgtk2.8 python-tk git-core
Create a script on the desktop to run pronterface when it is double-clicked:
cd ~/Desktop
touch 3DPrinter.sh
chmod 777 3DPrinter.sh
nano -w 3DPrinter.sh
Enter into it:
#!/bin/bash
cd ~/3DPrinting
./pronterface.py
Test it by double-clicking on the file.
Follow these instructions to remove the graphical display from pronterface.py so it uses less CPU time.
I wanted to be able to put gcode files on my server and immediately have access to them on the Raspberry Pi. This avoids the need to copy files around. I achieved that by mounting a Samba share on the Raspberry Pi on every boot. This is mostly cribbed from here.
sudo mkdir /etc/sambapasswords
sudo chmod 700 /etc/sambapasswords
sudo nano /etc/sambapasswords/myserver
Enter into the file:
username=windowsusername
password=mypassword
Save and then:
sudo chmod 600 /etc/sambapasswords/myserver
sudo mkdir /mnt/myserver
sudo nano -w /etc/fstab
Enter a new last line with (change the IP address to that of your server):
//192.168.1.52/3DPrintingFiles /mnt/myserver cifs credentials=/etc/sambapasswords/myserver 0 0
Test with:
sudo mount -a
That’s it!
Convert Any Audio Source Into MP3
Jul 6th
Here is my method that I know works. If you have a better one feel free to post it in the comments section. It may not produce the best quality audio but I’m sure it can be improved.
Obtain a 3.5mm to 3.5mm audio cable, for example this one. Connect one end to the audio source (for example a PC) and the other end to the microphone in on your linux box (I tried line in but that didn’t work for some reason).
Make sure ALSA utilities and ffmpeg are installed (at a console prompt):
$ sudo apt-get install alsa-utils ffpmeg
Start recording with:
$ arecord -f cd -t wav test.wav
Start the audio source and once complete press Ctrl-C to stop recording. Convert to MP3 with:
$ ffmpeg -b 128k -i test.wav test.mp3
I then run the file through MP3Gain as the recordings tend to be a bit quiet and add tags in iTunes.

Graphing Ping Times
Mar 29th
I recently had the need to generate a graph of ping times between my PC and a British Telecom server. After a quick web search the only options I found were commercial programs or free software that was incredibly bloated, complex to configure and with lots of dependencies. There must be a simpler way, and there is. Perl.
Here is my script:
#!/usr/bin/perl
# Converts ping output into a CSV file for graphing
# andy at british ideas dot com - March 29th 2011
# Public Domain
# Run using:
# ping -D 100.101.102.103 | ./pingtocsv.pl > output.csv
# or:
# cat pingdump.txt | ./pingtocsv.pl > output.csv
print "Measurement Time,Ping Time\n";
while (<STDIN>) {
  if ($_ =~ m/^\[([0-9\.]+)\].*time\=([0-9\.]+).*/i) {
    print "$1,$2\n";
  }
}
close(STDIN);
The Progress of Linux
Mar 4th
Back in 1998 I tried installing RedHat 6 on a spare PC. When the desktop loaded it was, ummm, wobbly. I then spent the best part of the next two weeks fighing with X configuration files setting obscure items such as front and back porches in a futile attempt to stabilize the display so it would be usable. I gave up.
Fast forward to March 2011 and Ubuntu 10.10. I’ve used lots of different versions of Ubuntu since 2006 on a variety of machines including for CNC control, but the last time I installed in a dual boot system was two years ago. Ubuntu 10.10 works fine in a virtual machine inside Windows 7 but I wanted to run it at full speed. More >
You Tube, H.264, High Definition and FFmpeg
Jun 3rd
Recently I had the need to take a set of jpeg images and convert them into a high definition time lapse video, then upload to You Tube. Easier said than done…
To get the best quality I wanted to use H.264/MP4, which is also recommended by You Tube. I also wanted 1080P. The problem is that You Tube doesn’t seem to like B-frames in the file, and messes up the start of videos. So here is the solution I found.
Firstly I needed to upgrade my Debian server to Squeeze.
Next I compiled x264 and FFmpeg as described in How To Build FFmpeg on Debian Squeeze.
Finally I ran the following FFmpeg command line to generate a time lapse video at 24 frames per second (-r 24), using 1080P (-s hd1080) with no B-frames (-bf 0):
ffmpeg -r 24 -i %04d.jpg -s hd1080 -vcodec libx264 -vpre hq -bf 0 -crf 16 myfile.mp4
It’s important that the frame rate is specified before the input source in order to make FFmpeg apply the frame rate to the source. Note that trying to use qt-faststart causes You Tube to complain about the audio, even though there isn’t any audio.
Fireball V90 EMC2 Configuration Files
Mar 4th
I am making my configuration files available to help anyone trying to get their Fireball V90 machine working with EMC2. The configuration is for inches, 1/4 microstepping and the HobbyCNC Pro board.
To use these files you will first need to perform the latency test and work out the base period for your PC. Open the Stepconf wizard and choose to update this configuration. Put the latency test results into the Stepconf wizard. Then you must double-check the pin configurations for your board if you are not using the same one I am. These changes are easy to make. I recommend 1/4 microstepping as it gives smooth operation without much reduction in power and speed.
Note that Stepconf will tell you that the INI file has changed since the configuration was generated. I changed the DEFAULT_VELOCITY to 0.9 so the default jogging speed is a bit faster.
Download Fireball V90 EMC2 Configuration Files.
Update: Now with Stepconf generated config files.
Installing Ubuntu Netbook Remix on an Acer Aspire One
Jan 14th
The Acer Aspire One is a pretty nice netbook – for a reasonable price you get 1Gb RAM, 160Gb hard drive, 1024 x 600 screen and 5 1/2 hours of battery life. However it comes with Windows XP or Linpus, which is a customized Linux distribution from Acer. Neither of these options appealed to me. In particular the Aspire One user forums seemed to have a lot of postings on limitations with Linpus.
Enter Ubuntu Netbook Remix (UNR), which is a special version of Ubuntu 8.04 for netbooks. Essentially it is the same as Ubuntu 8.04, but with some additions that make it easier to use on a small screen with limited height. Because netbooks don’t have optical drives it presents a challege to get a new operating system installed. Below is the process I found to work for me. I used Ubuntu on a desktop PC for all the steps.
Firstly note that I tried and failed to get a USB hard drive to work. I partitioned and formatted it every way I could and couldn’t get it to work. I managed to the the UNR installer to boot, but it always failed with “sdb: unknown partition table”. The process only seems to work with USB flash drives. I used a Sandisk Cruzer Micro 4Gb.
1. Download UNR 1.0.1 image from:
http://oem-images.canonical.com/unr/unr-1.0.1.img
2. Plug in USB drive and identify device location. Mine was /dev/sdb mounted to /media/disk.
3. At command prompt:
sudo dd if=./unr-1.0.1.img of=/dev/sdb bs=1024
4. fdisk -l will then show:
Disk /dev/sda: 250.0 GB, 250000000000 bytes

255 heads, 63 sectors/track, 30394 cylinders

Units = cylinders of 16065 * 512 = 8225280 bytes

Disk identifier: 0x88000000
Device Boot      Start         End      Blocks   Id  System

/dev/sda1               1           8       64228+  de  Dell Utility

/dev/sda2               9        1314    10485760    7  HPFS/NTFS

Partition 2 does not end on cylinder boundary.

/dev/sda3   *        1315        7769    51849787+   7  HPFS/NTFS

/dev/sda4            7770       30394   181735312+   5  Extended

/dev/sda5            7770       23109   123218518+   7  HPFS/NTFS

/dev/sda6           23110       29908    54612936   83  Linux

/dev/sda7           29909       30394     3903763+  82  Linux swap / Solaris
Disk /dev/sdb: 4016 MB, 4016045568 bytes

124 heads, 62 sectors/track, 1020 cylinders

Units = cylinders of 7688 * 512 = 3936256 bytes

Disk identifier: 0x8ef631df
This doesn't look like a partition table

Probably you selected the wrong device.
Device Boot      Start         End      Blocks   Id  System

/dev/sdb1   ?      274784      529564   979374166   66  Unknown

Partition 1 has different physical/logical beginnings (non-Linux?):

phys=(734, 123, 14) logical=(274783, 70, 21)

Partition 1 has different physical/logical endings:

phys=(120, 143, 6) logical=(529563, 65, 22)

Partition 1 does not end on cylinder boundary.

/dev/sdb2   ?      448668      961719  1972168331    7  HPFS/NTFS

Partition 2 has different physical/logical beginnings (non-Linux?):

phys=(187, 180, 14) logical=(448667, 16, 52)

Partition 2 has different physical/logical endings:

phys=(784, 0, 13) logical=(403059, 76, 1)

Partition 2 does not end on cylinder boundary.

/dev/sdb3   ?      426615      680707   976730017   7d  Unknown

Partition 3 has different physical/logical beginnings (non-Linux?):

phys=(252, 59, 46) logical=(426614, 84, 39)

Partition 3 has different physical/logical endings:

phys=(139, 118, 4) logical=(122048, 22, 28)

Partition 3 does not end on cylinder boundary.

/dev/sdb4   ?       36178       37261     4161536   6f  Unknown

Partition 4 has different physical/logical beginnings (non-Linux?):

phys=(370, 101, 50) logical=(36177, 96, 57)

Partition 4 has different physical/logical endings:

phys=(10, 114, 13) logical=(37260, 47, 62)

Partition 4 does not end on cylinder boundary.
Partition table entries are not in disk order
Don’t worry about the errors – they don’t seem to be important.
5. Unmount the USB drive by right-clicking on the icon on the desktop.
6. Plug USB drive into Aspire one and boot. At Acer screen press F12 to get to the boot menu.
7. On the boot menu the USB drive will appear twice:
USB Floppy Drive
USB CDROM
This because there is a second hard-coded, read only partition that appears as a CDROM drive. Choose the floppy drive option. Press Enter at the prompt and UNR will now install. Follow the on-screen instructions.
8. At this point you probably want to change the name of the computer. It seems to default to the name of the first user. Go to Administration -> Network, click on “Unlock” and enter your password.
9. Click on the General tab and enter a new name in the Hostname field.
10. Reboot. Clicking on “Quit…” didn’t seem to work. Holding down the power button for a second or so brought up the shutdown options screen. Note that after the reboot the “Quit…” option started working, so I guess the reboot is necessary.
Cleaning Up Your USB Drive
1. Install GParted from Add/Remove…
2. Go to System -> Administration -> Partition Editor
3. Plug in the USB drive and select it from the list at the top right (for example /dev/sdb).
4. Right click on the drive on the desktop and unmount it.
5. Select the partition (there will only be one for some strange reason) and delete it. Click on Apply to confirm.
6. Create a new FAT32 primary partition. Click on Apply.
7. Remove and insert the USB drive to mount it.
