Interesting Tech Projects
Cooling Fan Bracket for RepRapPro Mendel
Update: I’ve created a new version of the bracket
My RepRap printer is a Mendel kit from RepRapPro. One of the limitations is that it can’t cool layers as they are being printed. If a layer is too small (a small part or a small cross-section) then the layer can’t cool enough before the next layer is deposited on top.
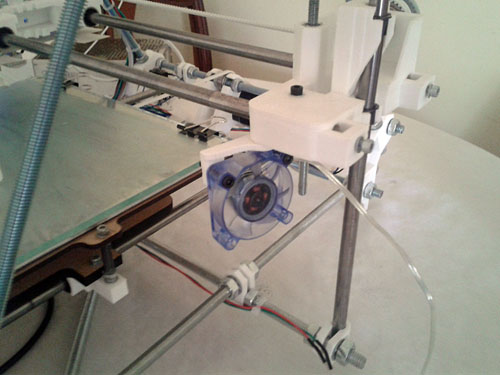
One of the first modifications everyone makes to their 3D printer is to add a cooling fan and here I present my solution. It’s a small bracket that attaches to a spare M3 hole on the end of the X-Axis gantry and allows attachment of a 40mm chipset fan.
Instructions:
- Print out the part. I used PLA with 25% fill density. I recommend printing out two or three at once to get a good mounting hole on the vertical section.
- Attach the fan using two M3x20 bolts with two M3 nuts and two M3 washers.
- Attach the bracket using a M3x25 bolt, one M3 nut and two M3 washers.
- Angle the fan so it is pointing at the print head.
- Mark which fan wire is negative and positive then cut off the connector.
- Solder on extension wires and use heatshrink to cover the solder joints.
- Connect the wires to the spare connector on the Melzi board.
Slic3r has a Cooling section under the Filament settings. Use this to turn on the fan after the first one or two layers.
I bought an Akasa Blue LED chipset fan that matches exactly the fan that comes with the printer. Small quantities of M3 cap screws can be bought from ModelFixings if you don’t have any left over from building your printer.
The STL file is available on Thingiverse, including the Alibre Design source file.
| Print article | This entry was posted by Andy on August 27, 2012 at 2:41 am, and is filed under 3D Printing. Follow any responses to this post through RSS 2.0. Both comments and pings are currently closed. |
No comments yet.
Comments are closed.

