Interesting Tech Projects
Archive for September, 2012

Setting up Raspberry Pi for 3D Printing with RepRap
Sep 29th
Having a 3D printer is cool, but requires a PC to be attached to it for control and monitoring (things like jogging, setting temperatures and even sending the gcode). Wouldn’t it be nice if the PC was a small circuit board attached to the printer making it a compact all-in-one solution? Here is how to use a Raspberry Pi $25 PC to do exactly that!
Goals:
- Use VNC to remotely view the desktop on the Raspberry Pi
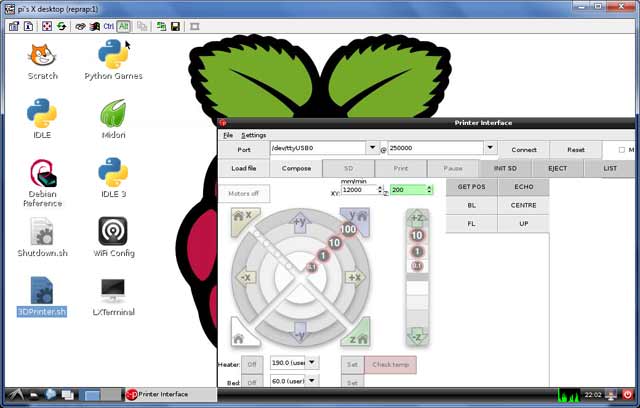
- There are two scripts on the desktop – starting pronterface and shutting down.
- gcode files on a server are automatically available on every boot
- 250000 baud works fine
- Set up without connecting a TV, keyboard or mouse
1. Download the current version of Raspian. Beginning sometime in September an important USB problem was solved. I used the September 18th version and it works fine.
2. Download an application to copy the image file to an SD card. I used Win32DiskImager along with an 8GB SDHC SanDisk card. A fast card is important.
3. Insert the SD card into the Raspberry Pi, attach to a wall-wart USB power source, connect an ethernet cable and turn on the power.
The LEDs will turn on and flash a lot. The boot process should finish after a couple of minutes.
Now you have to find out the IP address that has been assigned to the Raspberry Pi. Probably the easiest way is to log into your router and look at the connected devices. If your router is like mine then it shows “raspberry pi” as the device name and clicking on it gives the IP address.
Next connect using a SSH terminal application. I recommend PuTTY. Enter the IP address and log in with username “pi” and password “raspberry”. Then enter:
sudo apt-get update
sudo apt-get dist-upgrade
sudo apt-get install git-core
sudo wget http://goo.gl/1BOfJ -O /usr/bin/rpi-update && sudo chmod +x /usr/bin/rpi-update
sudo rpi-update
sudo reboot
After the reboot log back in and:
sudo apt-get install tightvncserver
tightvncserver
vncserver :1 -geometry 1024x728 -depth 24
When prompted for a password enter what you want to use to protect access to the printer. For example I used “reprap”.
Test you can connect and view the desktop by installing TightVNC on your PC and connecting using the IP address with “:1” after it. For example my Raspberry Pi was at 192.168.1.150:1.
Follow the instructions given here to assign a static IP address and start the TightVNC server on boot. Test by rebooting and connecting using TightVNC.
You can edit /etc/hostname and /etc/hosts to change the name from raspberrypi to something like reprap, if you desire.
Create a script on the desktop to shut down the Raspberry Pi when it is double-clicked:
cd ~/Desktop
touch Shutdown.sh
chmod 777 Shutdown.sh
nano -w Shutdown.sh
Enter into it:
#!/bin/bash
shutdown -h now
Test that double-clicking on the file and choosing “Execute” causes the Raspberry Pi to shut down.
Add the user pi to the dialout group so that the USB serial ports can be used:
sudo usermod -G dialout pi
Expand the filesystem to use the entire SD card:
sudo raspi-config
Choose the item from the menu to expand the root partition.
Run raspi-config again and choose the overclocking option and select a faster speed. Currently I’m not sure which are unreliable (if any!).
Download printrun and put it somewhere useful, for example /home/pi/3DPrinting.
Install the dependencies for printrun:
sudo apt-get install python-serial python-wxgtk2.8 python-tk git-core
Create a script on the desktop to run pronterface when it is double-clicked:
cd ~/Desktop
touch 3DPrinter.sh
chmod 777 3DPrinter.sh
nano -w 3DPrinter.sh
Enter into it:
#!/bin/bash
cd ~/3DPrinting
./pronterface.py
Test it by double-clicking on the file.
Follow these instructions to remove the graphical display from pronterface.py so it uses less CPU time.
I wanted to be able to put gcode files on my server and immediately have access to them on the Raspberry Pi. This avoids the need to copy files around. I achieved that by mounting a Samba share on the Raspberry Pi on every boot. This is mostly cribbed from here.
sudo mkdir /etc/sambapasswords
sudo chmod 700 /etc/sambapasswords
sudo nano /etc/sambapasswords/myserver
Enter into the file:
username=windowsusername
password=mypassword
Save and then:
sudo chmod 600 /etc/sambapasswords/myserver
sudo mkdir /mnt/myserver
sudo nano -w /etc/fstab
Enter a new last line with (change the IP address to that of your server):
//192.168.1.52/3DPrintingFiles /mnt/myserver cifs credentials=/etc/sambapasswords/myserver 0 0
Test with:
sudo mount -a
That’s it!

RepRap Cheap Spool Solution
Sep 16th
Faberdashery supplies very nice 1.75mm PLA however it doesn’t come on a spool. This is annoying. Having to sit at my 3D printer and constantly untangle filament is not my idea of fun so I desperately needed a spool solution. The default response from RepRappers seems to be “print one” so I worked on a design. The total cost of the plastic was a staggering £11.30. That is a crazy price, especially considering I wanted several spools. Also printing out a spool would take hours of having to sit and untangle filament.
After a couple of hours with a scrollsaw (fretsaw) and some 3mm MDF I had a spool that cost about £1.
The next problem was to create a spool holder. These can be found on Thingiverse in different types and styles however the cleverest (and ones with the least amount of plastic) involved sitting the spool on four bearings. This is a great idea because the spool holder can be easily resized for different spool sizes and trivially scaled to hold multiple spools at the same time.
Spool (files on Thingiverse)
Cut out two of the plates and two of the ends. If your wood is thicker than 3mm then increase the width of the holes in the ends and the length of the tabs on the plates to match.
Drill two 2.5mm holes near the center of one of the ends to hold the start of the filament. Drill some 2.5mm holes near the outside edge to hold the end of the filament when storing it.
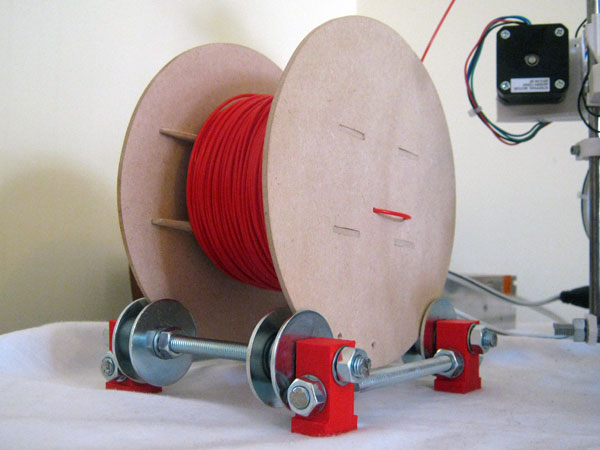
Glue the parts together to make the spool. The diameter is 160mm and the width is 90mm. It easily holds 100m of 1.75mm PLA and should hold 300m.
Holder (files on Thingiverse)
Print out four of the foot parts. Cut some M8 threaded rod into four 150mm lengths.
Assemble the two crossbeams as follows (all parts are M8):
nut, lock washer, plastic part, lock washer, mudguard washer, washer, 608ZZ bearing, washer, mudguard washer, lock washer, nut, nut, lock washer, mudguard washer, washer, 608ZZ bearing, washer, mudguard washer, lock washer, plastic part, lock washer, nut
Assemble the two front-back beams as follows:
nut, lock washer, plastic part, lock washer, nut, nut, lock washer, plastic part, lock washer, nut

