Interesting Tech Projects
CHDK and Canon A480 Quick Start Guide
CHDK is an alternative firmware for some Canon cameras. It provides access to lots of cool features that are found only on high end SLR cameras, plus some features that are not found anywhere.
Why the Canon A480? Because refurbished cameras are available for $75 from Adorama with a one year warranty and only one version of firmware has been seen on them to date. This means that there is a very good chance the firmware in the A480 you receive will be compatible with CHDK.
This short guide shows how to quickly access some useful features. It is not intended to be exhaustive or replace the CHDK wiki or forums.
CHDK can be set to automatically load when the camera is turned on, however I don’t use that feature because I want to use an 8Gb SD memory card. Cards of 8Gb create complications when autoloading CHDK, but I want the extra space for long time lapse photography.
Download and extract the A480 “full” CHDK zip file from the CHDK website. Extract the files to the top level of your SD card and put the card into your camera.
Loading CHDK
- Turn the camera on by pressing the Play button
- Press the Menu button
- Scroll down to “Firm Update” and select it, then select “OK” to confirm. After a delay the CHDK logo and version number will appear.
- Half press the shutter button to switch to record mode
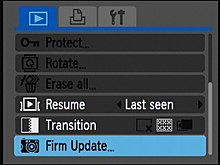
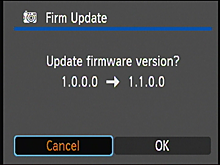
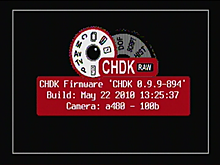
The rest of this guide assumes your camera is in record mode, unless stated otherwise.
Turn on Histogram
- Press Mode and “<Alt>” appears at the bottom of the screen. This allows access to the CHDK menu
- Press Menu. Note that the menu may occasionally disappear while you are using it. It’s still there, just press the navigation buttons and it will reappear.
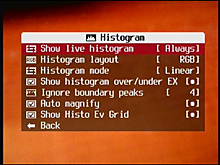
- Choose Histogram Parameters
- Press the right button to change Show Live Histogram from “Don’t” to “Always”
- Press Menu to exit the menu
- Press Mode and “<Alt>” disappears from the bottom of the screen.
A live histogram will now be displayed on the screen.
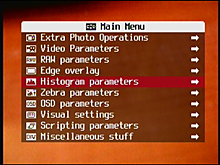
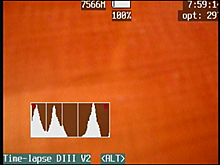
To turn off the histogram:
- Press Mode to get into Alt mode then Menu
- Choose Histogram Parameters then change Show Live Histogram from “Always” to “Don’t”
- Press Menu to exit the menu and Mode to exit the Alt mode
Display Depth of Field
CHDK can display depth of field information. To turn it on:
- Press Mode to get into Alt mode then Menu
- Choose OSD Parameters then DOF Calculator
- Change Show DOF Calculator from “Don’t” to “Separat”
- Press Menu to exit the menu then Mode to exit Alt mode
Choose a subject and half press the shutter button. On the screen you will see a set of values in meters.
- S = distance to subject
- R1 = distance towards camera before subject is out of focus
- R2 = distance away from camera before subject is out of focus
- DOF = depth of field (R2 – R1)
- HYP = hyperfocal distance
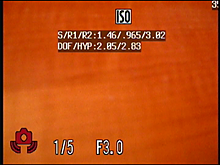
To turn off:
- Press Mode to get into Alt mode then Menu
- Choose OSD Parameters then DOF Calculator
- Change Show DOF Calculator from “Separat” to “Don’t”
- Press Menu to exit the menu then Mode to exit Alt mode
Manual Focus
The Canon A480 doesn’t have manual focus, but CHDK does. To enable:
- In record mode press Mode to get into Alt mode
- Press ISO (i.e. up). The at the top left in red something like “SD: 2369 FACTOR: 1” will appear. 2369 is the subject distance in millimeters
- Press the flash button (i.e. right) to change the factor to 10. Press it again to change it to 100
- Press the zoom buttons to change the subject distance. It will change 100 mm at a time.
- Press the Macro/Infinity button (i.e. left) to change the factor back to 10.
- Press the zoom buttons to change the subject distance 10 mm at a time
- Press Mode to exit Alt mode. At the top left in red the current SD value should be shown
- Half press the shutter button and the auto focus mechanism will focus on the subject. CHDK will then immediately change the focus to the previously set value.
To turn off:
- Press Mode to get into Alt mode
- Press ISO (i.e. up). The red text showing the SD and factor values will disappear.
Continuous Bracketing
CHDK can configure the camera to change one or more of the shutter speed, ISO and subject distance every time a shot is taken in continuous mode. Here is an example using the subject distance:
- Press Mode to get into Alt mode then press Menu
- Choose Extra Photo Operations followed by Bracketing in Continuous Mode
- Set Subj. Dist. Bracket Valu to “20”
- Set the Value Factor (mm) to “1”
- Set the Bracketing type to +/-
- Press Menu and then Mode to exit the Alt mode
- Press Func/Set and enable continuous mode. At this point in red at the top left will be “BRACKET: +/- SD:20”
- Half press the shutter button to focus then hold down the shutter button to take a series of pictures
Every time a picture is taken CHDK will “oscillate” the subject distance in front and behind the auto focus point in steps of 20 mm. For example if the auto focus subject distance was 100 mm then the sequence will be:
- 100 mm, 120 mm, 80 mm, 140 mm, 60mm, 160 mm, 40 mm, etc.
If the Bracketing type is changed to “+” then the camera will keep increasing the subject distance for each shot and it will keep reducing the subject distance for “-“.
To turn off:
- Press Mode to get into Alt mode then Menu
- Choose Extra Photo Operations followed by Bracketing in Continuous Mode
- Set the Value Factor (mm) to “Off”
- Press Menu and then Mode to exit the Alt mode
Extreme Shutter Speeds
It is possible to set the Canon A480 to a shutter speed of 1/100,000. Yes, you read that right. To enable:
- Press Mode to get into Alt mode then Menu
- Choose Extra Photo Operations
- Change Override Shutter Speed to “1/100k” and change the Value Factor to “1”
- Press Menu and then Mode to exit Alt mode. At red in the top left it should display “TV: 1/100k”
Now take a picture of something bright, like a macro of a lightbulb.
It is also possible to take very long exposures. Setting the Override Shutter Speed to “2048” will use 2048 seconds, which is 34 minutes!
To turn off:
- Press Mode to get into Alt mode the Menu
- Choose Extra Photo Operations
- Change the Value Factor to “Off”
- Press Menu then Mode to exit Alt mode
Changing Camera Modes
When not using CHDK pressing the Mode button switches between Auto, P, Scene and Movie modes. However when using CHDK the Mode button switches between Canon menus and CHDK menus. How can the original functionality be obtained?
When CHDK is loaded press and hold the Mode button down to switch between the camera modes.
Time Lapse Scripts
The CHDK forum has a lot of different scripts. I found the one which looked the best to me and tweaked it for the Canon A480. Copy the script at the bottom of this post and save as “LAPSED3.LUA” in the folder CHDK\SCRIPTS on the SD card.
For high definition movies it helps to switch the camera to widescreen pictures first, as the pictures will have the correct aspect ratio. The widescreen images taken by the Canon A480 have better than 1080P resolution.
To run the script:
- Put the camera into record mode
- Press Menu and change Review to “Off”
- Press Mode to get into Alt mode then Menu
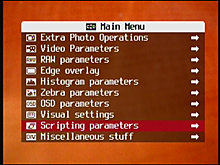
- Choose Scripting Parameters then Load Script From File…
- Choose “LAPSED32.LUA”
- Change Secs/frame to “2”
- Change Sequence minutes to “10”
- Change Focus to “1”
- Make sure Display off frame is always “0”. Failure to do this will stop the time lapse script from working
- Press Menu. At the bottom of the screen it should show the name of the script “Time-lapse DIII V2”
- Fully press the shutter button to start the script. At this point the camera should start taking one picture every two seconds, which is pretty much as fast as it will go when using scripts
- Press the shutter button again to stop the script
- Press Mode to exit the Alt mode
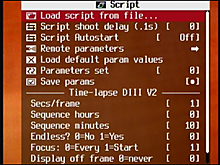
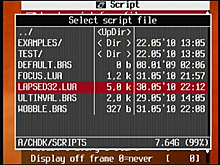
The following script was taken from the CHDK wiki and modified by me to work on the A480. I also added notes to the CHDK wiki page describing the propcase change needed. This version differs from the wiki version in that it uses the camera’s auto focus lock button combination, which I found works a bit better than calling set_aflock. I didn’t modify the version in the wiki because I am not sure which cameras have that feature.
--[[
Author: Fraser McCrossan
Tested on G9, should work on most cameras.
Modified by andy atat britishideas dotdot com for the A480 - uses camera's autofocus lock and Digic III propcases
An accurate intervalometer script, with pre-focus and screen power off options.

Features:
 - input is frame interval plus total desired run-time (or "endless")
 - displays frame count, frame total and remaining time after each frame
 (in endless mode, displays frame count and elapsed time)
 - honours the "Display" button during frame delays (so you can
 get it running then turn off the display to save power)
 - can turn off the display a given number of frames after starting
 (might take a couple of frames longer to cycle to correct mode)
 - can pre-focus before starting then go to manual focus mode
 - use SET button to exit

 See bottom of script for main loop.
]]

--[[
@title Time-lapse DIII V2
@param s Secs/frame
@default s 5
@param h Sequence hours
@default h 0
@param m Sequence minutes
@default m 5
@param e Endless? 0=No 1=Yes
@default e 0
@param f Focus: 0=Every 1=Start
@default f 0
@param d Display off frame 0=never
@default d 0
--]]

-- convert parameters into readable variable names
secs_frame, hours, minutes, endless, focus_at_start, display_off_frame = s, h, m, (e > 0), (f > 0), d

props = require "propcase"

-- derive actual running parameters from the more human-friendly input
-- parameters
function calculate_parameters (seconds_per_frame, hours, minutes, start_ticks)
 local ticks_per_frame = 1000 * secs_frame -- ticks per frame
 local total_frames = (hours * 3600 + minutes * 60) / secs_frame -- total frames
 local end_ticks = start_ticks + total_frames * ticks_per_frame -- ticks at end of sequence
 return ticks_per_frame, total_frames, end_ticks
end

function print_status (frame, total_frames, ticks_per_frame, end_ticks, endless)
 local free = get_jpg_count()
 if endless then
 local h, m, s = ticks_to_hms(frame * ticks_per_frame)
 print("#" .. frame .. ", " .. h .. "h " .. m .. "m " .. s .. "s")
 else
 local h, m, s = ticks_to_hms(end_ticks - get_tick_count())
 print(frame .. "/" .. total_frames .. ", " .. h .. "h" .. m .. "m" .. s .. "s/" .. free .. " left")
 end
end

function ticks_to_hms (ticks)
 local secs = (ticks + 500) / 1000 -- round to nearest seconds
 local s = secs % 60
 secs = secs / 60
 local m = secs % 60
 local h = secs / 60
 return h, m, s
end

-- sleep, but using wait_click(); return true if a key was pressed, else false
function next_frame_sleep (frame, start_ticks, ticks_per_frame)
 -- this calculates the number of ticks between now and the time of
 -- the next frame
 local sleep_time = (start_ticks + frame * ticks_per_frame) - get_tick_count()
 if sleep_time < 1 then
 sleep_time = 1
 end
 wait_click(sleep_time)
 return not is_key("no_key")
end

-- delay for the appropriate amount of time, but respond to
-- the display key (allows turning off display to save power)
-- return true if we should exit, else false
function frame_delay (frame, start_ticks, ticks_per_frame)
 -- this returns true while a key has been pressed, and false if
 -- none
 while next_frame_sleep (frame, start_ticks, ticks_per_frame) do
 -- honour the display button
 if is_key("display") then
 click("display")
 end
 -- if set key is pressed, indicate that we should stop
 if is_key("set") then
 return true
 end
 end
 return false
end

-- if the display mode is not the passed mode, click display and return true
-- otherwise return false
function seek_display_mode(mode)
 if get_prop(props.DISPLAY_MODE) == mode then
 return false
 else
 click "display"
 return true
 end
end

-- switch to autofocus mode, pre-focus, then go to manual focus mode
function pre_focus()
 local focused = false
 local try = 1
 -- set focus mode to infinity
 -- set_prop(6, 3)
 while not focused and try <= 5 do
 print("Pre-focus attempt " .. try)
 press("shoot_half")
 sleep(2000)
 if get_prop(18) > 0 then
 focused = true
 -- lock autofocus
 press("left")
 --set_aflock(1)
 end
 release("shoot_half")
 sleep(500)
 try = try + 1
 end
 return focused
end

if focus_at_start then
 if not pre_focus() then
 print "Unable to reach pre-focus"
 end
end

start_ticks = get_tick_count()

ticks_per_frame, total_frames, end_ticks = calculate_parameters(secs_frame, hours, minutes, start_ticks)

frame = 1
original_display_mode = get_prop(props.DISPLAY_MODE)
target_display_mode = 2 -- off

print "Press shutter button to exit"

while endless or frame <= total_frames do
 print_status(frame, total_frames, ticks_per_frame, end_ticks, endless)
 if display_off_frame > 0 and frame >= display_off_frame then
 seek_display_mode(target_display_mode)
 end
 shoot()
 if frame_delay(frame, start_ticks, ticks_per_frame) then
 print "User quit"
 break
 end
 frame = frame + 1
end

-- restore display mode
if display_off_frame > 0 then
 while seek_display_mode(original_display_mode) do
 sleep(1000)
 end
end

-- restore focus mode
set_aflock(0)
| Print article | This entry was posted by Andy on June 3, 2010 at 10:35 pm, and is filed under Photography. Follow any responses to this post through RSS 2.0. Both comments and pings are currently closed. |
Comments are closed.

about 14 years ago
Sorry to say, but on my A480, pressing ISO (up) does not get me the SD 2369 Factor 1 screen… ?
about 14 years ago
You have to be in shooting mode AND alt mode. I just tried it and it works for me. If you can’t get it to work then I recommend you post on the CHDK forum.
about 14 years ago
As I am new to this, the line numbers I should strip out of the script before loading it?
about 14 years ago
Yes. If you scroll to the top of the script and put the pointer over it, some icons should appear. Click on the one that copies the script to the clipboard. You can then paste it into Nodepad and save to your memory card.
about 14 years ago
When I save as an LUA file, my A480 sees it as a TXT file… ?
about 14 years ago
There is a red square top left saying CHDK Unk Stat
about 14 years ago
Sorry not CHDK, but UBASIC Unk stat
about 14 years ago
Thank you so much for posting this guide!
I’m trying to take multiple shots (of a book, flipping page between each shot), and am considering using an a480. I’ll be using CHDK for ‘remote’ shooting via USB. I’ve been concerned about lack of Manual Focus. So, a question: will manual focus settings as you’ve described remain constant across multiple shots? Or will the camera automatically revert to autofocus after the first shot?
about 14 years ago
You have to enable hidden file extensions in Windows then rename the file to remove the txt extension that Notepad secretly added. CHDK is assuming the script is uBasic and not Lua because of the extension problem.
about 14 years ago
Works like a dream – the 2 second setting on my camera translates to about 7 seconds per shot, what with write-time to the SD card… perhaps a faste card? Thanks again, will try the wi-fi SD card and see if that simultaneously will write to my server so that I can review all photos remotely… 🙂
about 14 years ago
Nope, you have a problem somewhere. I get an average of 2 – 2.7 seconds per shot with a regular 8Gb Sandisk card. Made sure you disable picture reviewing in the regular Canon menu.
If it is still slow try disabling raw mode in CHDK and also try disabling noise subtraction in CHDK. If the scene is dark then noise subtraction can significantly slow things down. Even though it’s on the Raw menu it also affects jpegs.
about 14 years ago
Got the time per shot (set at 2 seconds as per tutorial) – down to 3 seconds – by turning OFF RAW+JPEG, and using smallest JPEG size of 640×480 (fine resolution). Any further trimming is due to write-delay, I’m sure!
about 14 years ago
The widescreen option is smaller than 10MP and allows you to create high definition time lapse movies.
about 14 years ago
My A480 “seems to shoot in RAW” but only my Picasa viewer can open it – CS3 doesn’t like, neither does another dedicated RAW editor called Picture Style Editor… 🙂
about 14 years ago
It may be a small bug in my CHDK but when I try to select DNG Format a dialog box shows up saying “Cannot load CHDK/badpixel.bin Please run CHDK/SCRIPTS/TEST/badpixel.lua” …
about 14 years ago
Doesn’t sound like a bug to me. Sounds like instructions.
about 14 years ago
Its confusing – RAW dialog lets you set .CR2 as raw suffix, then later asks if you want .DNG set as raw suffix – I am assuming that setting .DNG overwrites the previous .CR2 command? If so, mine is not allowing the change… 🙂
about 14 years ago
OK, solved that last by running badpixel.bin. Now all I need is a RAW editor that can open A480 CHDK .DNG files… any offers? @:)
about 14 years ago
PS7 I haven’t yet been able to open the DNG files, but CS3 it works fine!
about 14 years ago
Sir ,on running the script i am getting the error “40: module propcase not found no field package .preload[‘propcase’] ” using A480. please help,Thanks
about 14 years ago
Nice page, really helped me to get into CHDK. I have also bought A480 for its small size, CHDK and relatively low cost. I have used your scripts for Timelapse and KAP in timer and full remote control. It works, some tuning of fardware and scripts are still necessary as well as learning of CHDH.
Now I’am waiting for wind..
about 14 years ago
Hi,
The A480 sounds the perfect camera for my project. I want to setup a time-lapse camera for my new house build – only trouble is it is taking 8 months and i have no external power – and i don’t think the A480 batteries would last that long! I’m visiting the site every 2 weeks so could change batteries then and am wanting to take around 5 photos a day. Any ideas on how i can setup an external power supply for the A480? I was thinking of using a car battery and wiring to the battery compartment – with the appropriate voltage/current conversion.
about 14 years ago
Dear Mr. Andy
thank you very much for sharing the very useful information on timelapse photography. I use A480 canon. I tried Time lapse as per your instructions, its perfect. But, the output file format is .thm. I don’t know how to open .thm file!!!
please help me….
Dr.V.Balaji, India
about 14 years ago
Never heard of a .thm file. Sorry.
about 14 years ago
Dear Mr. Andy,
After following your valuble instructions, the camera works perfect.
I just found that I have video file and .thm file (in the same name). But, I need to take time lapse photographs (jpeg),
How to adjust the camera to get the time lapse photos (jpeg) instead of video
thanking you
Dr.V.Balaji
about 14 years ago
Finally I got it 🙂
about 14 years ago
I think i’ve worked out how to do my remote camera. I notice there is a DC input on the camera, if I can get a car charger that fits the camera then i can use this to power the camera off a standard car/motorbike 12v battery (with the right connections). Just need to find a compatible car charger for the A480.
about 14 years ago
This is working really great – well done on some good tips…….although watch out if you are copying files from a Mac rather than a PC, as the Mac adds some hidden stuff to the SD card you need to get rid of – see http://chdk.wikia.com/wiki/FAQ/Mac
If you are not seeing the ‘Firm Update’ menu and you are using a Mac then this is the problem!
about 14 years ago
I’m trying to take photos over a number of days – any ideas on how i can not take photos overnight? I was wondering if i could use the clock and restrict it to take photos only between, say, 9am and 4pm ?
Also need to disable the flash – but i guess i can do this before i run the script, which would be the easiest option.
about 14 years ago
Have now managed to power the camera from a car ‘cigarette charger’. Found the spec of the DC-In socket and bought a regulated car charger with the right DC fitting and it works great with the 12V battery!
about 14 years ago
This guide is great. The time lapse script works like a charm on my A480 thanks Andy for sharing it with us.
@ Peter what type of regulated car charger did you use? How much is the rated output current and voltage of the regulator? Thanks…
about 14 years ago
Jay – I bought a universal charger witch adjustable voltage on Amazon – it has 2Amp output and variable voltage – i set the voltage to 3v, based on the spec for the ACK800 official canon power supply. They just don’t do a car charger one.
The difficult bit was the connector, it needs a 0.75 x 2.5 DC jack, which was much smaller than the ones supplied with the universal charger – so i had to buy an additional ‘tip’ for the charger.
about 14 years ago
My house build cam is all setup now – many thanks for the script Andy. I’ve even modified slightly to only take pictures in the daytime as I’m running my time lapse over a number of days. After a bit of research I added the following function to test the light before taking a picture and then wait until it is light enough….
function wait_for_light()
repeat
sleep(5000)
print(“Waiting for light…”)
t=read_bv96()
until t>0
end
Just added a call to this function as the first line after your ‘while’ loop, ie,
while endless or frame <= total_frames do
wait_for_light()
print_status………etc
Works a treat!
about 14 years ago
“Change Secs/frame to “2″”
Can you change this to another number other than 2 or do you have to edit the script to change the interval?
about 14 years ago
I just purchased an a480. I’m looking at another memory card. Is there a particular reason for using 8gb or can you go higher?
about 14 years ago
i keep getting this error with this script –
UBASIC:1Unk stmt – ? it’s very small and difficult to read. i’m on a mac. Help please !
about 14 years ago
The shit works. I got it working without help from anyone and have never done this before. There is plenty of forum info out there. Dave with the Mac…. make sure you use something that will save the script to ANSI text.
about 14 years ago
I’m trying to use the script above as is and I can’t seem to turn off the display while in time lapse mode.
I know the author said to set the ‘Display off frame’ to zero in order for the script to work but then how does one turn off the LCD to achieve longer battery life?
the A480 doesn’t have a display button so I can’t turn off the display and then run the script.
Thanks
about 14 years ago
Plug the video out cable in, but leave it unconnected to anything else.
about 14 years ago
i used acid and SDMinst – works like a charm.
i now have two a480s rolling on a home remodel.
I’m in Minnesota, and the cameras will be outside, so i’m curious if the cold will gum things up.
about 14 years ago
Thanks for posting this. My new A480 is my third CHDK equipped Canon. For some reason I had a lot of trouble getting it running on my 480 but thanks to your complete guide it works like a charm.
about 14 years ago
@Peter and others looking for external power:
Check ebay, I found many external power supplies available specifically for the A480 at around $10. MacGyver not needed.
as far as being outside in the cold:
I place mine in a modified plexi-glass box with a chem pack hand warmer that lasts about 12 hrs for cold overnights.
about 14 years ago
Hello, I finally chdk installed on my Canon A480, which is also new to me. 3 Qs:
1) I can’t get the camera to give me shots with 10M resolution. Each shot is only about .5M
3) In the Adobe Bridge Advanced Dialog, I see files with .RAW extension. Adobe Photoshop CS3 won’t open them. In chdk I changed the file extension to .CR2; when I upload the files to the Mac, they still display as .RAW and Adobe Photoshop CS3 still won’t open them. Any ideas? Thanks so much.
about 14 years ago
1) Never mind on the 1st one; I just discovered that the tiny brochure with my used camera was only a “Quick Start” & not a manual. No wonder I couldn’t figure anything out.
about 14 years ago
Never mind on 3) either for now; I just found a CHDK user guide in Wikipedia. Thanks.
about 13 years ago
Thank you! Everything works just fine after half an hour of setting up all of this stuff! 😀
about 13 years ago
.thm file is a THuMbnail file! CHDK works very well – recently, there have been burglaries in my area – I have just purchased some cheap power-supplies, and will have 3 x A480 cameras shooting at 10 second intervals – which I can render into a movie using VirtualDub – economic security cameras with great detail and resolution. I also intend to make a Eurostar movie – London to Brussels – and post it to YouTube 🙂
about 13 years ago
Hi Guys,
I’m using a A480 with chdk, i’m also using a power supply bough on ebay however when ever i try and enter camera mode to start the time laps script the camera tells me to “charge the batteries” but only when the power supply is connected i’ve tried fully charged batteries and no batteries same result.
Any one know why this is?
M