Interesting Tech Projects
CHDK and Canon A480 Quick Start Guide
CHDK is an alternative firmware for some Canon cameras. It provides access to lots of cool features that are found only on high end SLR cameras, plus some features that are not found anywhere.
Why the Canon A480? Because refurbished cameras are available for $75 from Adorama with a one year warranty and only one version of firmware has been seen on them to date. This means that there is a very good chance the firmware in the A480 you receive will be compatible with CHDK.
This short guide shows how to quickly access some useful features. It is not intended to be exhaustive or replace the CHDK wiki or forums.
CHDK can be set to automatically load when the camera is turned on, however I don’t use that feature because I want to use an 8Gb SD memory card. Cards of 8Gb create complications when autoloading CHDK, but I want the extra space for long time lapse photography.
Download and extract the A480 “full” CHDK zip file from the CHDK website. Extract the files to the top level of your SD card and put the card into your camera.
Loading CHDK
- Turn the camera on by pressing the Play button
- Press the Menu button
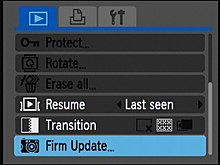
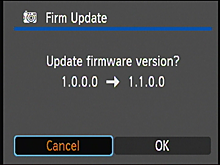
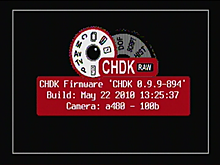
- Scroll down to “Firm Update” and select it, then select “OK” to confirm. After a delay the CHDK logo and version number will appear.
- Half press the shutter button to switch to record mode
The rest of this guide assumes your camera is in record mode, unless stated otherwise.
Turn on Histogram
- Press Mode and “<Alt>” appears at the bottom of the screen. This allows access to the CHDK menu
- Press Menu. Note that the menu may occasionally disappear while you are using it. It’s still there, just press the navigation buttons and it will reappear.
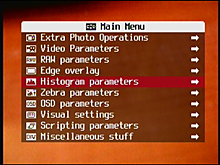
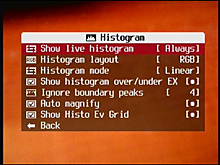
- Choose Histogram Parameters
- Press the right button to change Show Live Histogram from “Don’t” to “Always”
- Press Menu to exit the menu
- Press Mode and “<Alt>” disappears from the bottom of the screen.
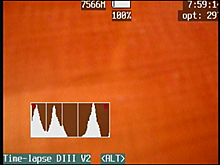
A live histogram will now be displayed on the screen.
To turn off the histogram:
- Press Mode to get into Alt mode then Menu
- Choose Histogram Parameters then change Show Live Histogram from “Always” to “Don’t”
- Press Menu to exit the menu and Mode to exit the Alt mode
Display Depth of Field
CHDK can display depth of field information. To turn it on:
- Press Mode to get into Alt mode then Menu
- Choose OSD Parameters then DOF Calculator
- Change Show DOF Calculator from “Don’t” to “Separat”
- Press Menu to exit the menu then Mode to exit Alt mode
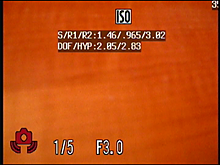
Choose a subject and half press the shutter button. On the screen you will see a set of values in meters.
- S = distance to subject
- R1 = distance towards camera before subject is out of focus
- R2 = distance away from camera before subject is out of focus
- DOF = depth of field (R2 – R1)
- HYP = hyperfocal distance
To turn off:
- Press Mode to get into Alt mode then Menu
- Choose OSD Parameters then DOF Calculator
- Change Show DOF Calculator from “Separat” to “Don’t”
- Press Menu to exit the menu then Mode to exit Alt mode
Manual Focus
The Canon A480 doesn’t have manual focus, but CHDK does. To enable:
- In record mode press Mode to get into Alt mode
- Press ISO (i.e. up). The at the top left in red something like “SD: 2369 FACTOR: 1” will appear. 2369 is the subject distance in millimeters
- Press the flash button (i.e. right) to change the factor to 10. Press it again to change it to 100
- Press the zoom buttons to change the subject distance. It will change 100 mm at a time.
- Press the Macro/Infinity button (i.e. left) to change the factor back to 10.
- Press the zoom buttons to change the subject distance 10 mm at a time
- Press Mode to exit Alt mode. At the top left in red the current SD value should be shown
- Half press the shutter button and the auto focus mechanism will focus on the subject. CHDK will then immediately change the focus to the previously set value.
To turn off:
- Press Mode to get into Alt mode
- Press ISO (i.e. up). The red text showing the SD and factor values will disappear.
Continuous Bracketing
CHDK can configure the camera to change one or more of the shutter speed, ISO and subject distance every time a shot is taken in continuous mode. Here is an example using the subject distance:
- Press Mode to get into Alt mode then press Menu
- Choose Extra Photo Operations followed by Bracketing in Continuous Mode
- Set Subj. Dist. Bracket Valu to “20”
- Set the Value Factor (mm) to “1”
- Set the Bracketing type to +/-
- Press Menu and then Mode to exit the Alt mode
- Press Func/Set and enable continuous mode. At this point in red at the top left will be “BRACKET: +/- SD:20”
- Half press the shutter button to focus then hold down the shutter button to take a series of pictures
Every time a picture is taken CHDK will “oscillate” the subject distance in front and behind the auto focus point in steps of 20 mm. For example if the auto focus subject distance was 100 mm then the sequence will be:
- 100 mm, 120 mm, 80 mm, 140 mm, 60mm, 160 mm, 40 mm, etc.
If the Bracketing type is changed to “+” then the camera will keep increasing the subject distance for each shot and it will keep reducing the subject distance for “-“.
To turn off:
- Press Mode to get into Alt mode then Menu
- Choose Extra Photo Operations followed by Bracketing in Continuous Mode
- Set the Value Factor (mm) to “Off”
- Press Menu and then Mode to exit the Alt mode
Extreme Shutter Speeds
It is possible to set the Canon A480 to a shutter speed of 1/100,000. Yes, you read that right. To enable:
- Press Mode to get into Alt mode then Menu
- Choose Extra Photo Operations
- Change Override Shutter Speed to “1/100k” and change the Value Factor to “1”
- Press Menu and then Mode to exit Alt mode. At red in the top left it should display “TV: 1/100k”
Now take a picture of something bright, like a macro of a lightbulb.
It is also possible to take very long exposures. Setting the Override Shutter Speed to “2048” will use 2048 seconds, which is 34 minutes!
To turn off:
- Press Mode to get into Alt mode the Menu
- Choose Extra Photo Operations
- Change the Value Factor to “Off”
- Press Menu then Mode to exit Alt mode
Changing Camera Modes
When not using CHDK pressing the Mode button switches between Auto, P, Scene and Movie modes. However when using CHDK the Mode button switches between Canon menus and CHDK menus. How can the original functionality be obtained?
When CHDK is loaded press and hold the Mode button down to switch between the camera modes.
Time Lapse Scripts
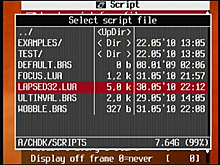
The CHDK forum has a lot of different scripts. I found the one which looked the best to me and tweaked it for the Canon A480. Copy the script at the bottom of this post and save as “LAPSED3.LUA” in the folder CHDK\SCRIPTS on the SD card.
For high definition movies it helps to switch the camera to widescreen pictures first, as the pictures will have the correct aspect ratio. The widescreen images taken by the Canon A480 have better than 1080P resolution.
To run the script:
- Put the camera into record mode
- Press Menu and change Review to “Off”
- Press Mode to get into Alt mode then Menu
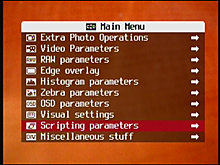
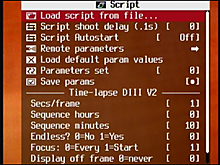
- Choose Scripting Parameters then Load Script From File…
- Choose “LAPSED32.LUA”
- Change Secs/frame to “2”
- Change Sequence minutes to “10”
- Change Focus to “1”
- Make sure Display off frame is always “0”. Failure to do this will stop the time lapse script from working
- Press Menu. At the bottom of the screen it should show the name of the script “Time-lapse DIII V2”
- Fully press the shutter button to start the script. At this point the camera should start taking one picture every two seconds, which is pretty much as fast as it will go when using scripts
- Press the shutter button again to stop the script
- Press Mode to exit the Alt mode
The following script was taken from the CHDK wiki and modified by me to work on the A480. I also added notes to the CHDK wiki page describing the propcase change needed. This version differs from the wiki version in that it uses the camera’s auto focus lock button combination, which I found works a bit better than calling set_aflock. I didn’t modify the version in the wiki because I am not sure which cameras have that feature.
--[[
Author: Fraser McCrossan
Tested on G9, should work on most cameras.
Modified by andy atat britishideas dotdot com for the A480 - uses camera's autofocus lock and Digic III propcases
An accurate intervalometer script, with pre-focus and screen power off options.

Features:
 - input is frame interval plus total desired run-time (or "endless")
 - displays frame count, frame total and remaining time after each frame
 (in endless mode, displays frame count and elapsed time)
 - honours the "Display" button during frame delays (so you can
 get it running then turn off the display to save power)
 - can turn off the display a given number of frames after starting
 (might take a couple of frames longer to cycle to correct mode)
 - can pre-focus before starting then go to manual focus mode
 - use SET button to exit

 See bottom of script for main loop.
]]

--[[
@title Time-lapse DIII V2
@param s Secs/frame
@default s 5
@param h Sequence hours
@default h 0
@param m Sequence minutes
@default m 5
@param e Endless? 0=No 1=Yes
@default e 0
@param f Focus: 0=Every 1=Start
@default f 0
@param d Display off frame 0=never
@default d 0
--]]

-- convert parameters into readable variable names
secs_frame, hours, minutes, endless, focus_at_start, display_off_frame = s, h, m, (e > 0), (f > 0), d

props = require "propcase"

-- derive actual running parameters from the more human-friendly input
-- parameters
function calculate_parameters (seconds_per_frame, hours, minutes, start_ticks)
 local ticks_per_frame = 1000 * secs_frame -- ticks per frame
 local total_frames = (hours * 3600 + minutes * 60) / secs_frame -- total frames
 local end_ticks = start_ticks + total_frames * ticks_per_frame -- ticks at end of sequence
 return ticks_per_frame, total_frames, end_ticks
end

function print_status (frame, total_frames, ticks_per_frame, end_ticks, endless)
 local free = get_jpg_count()
 if endless then
 local h, m, s = ticks_to_hms(frame * ticks_per_frame)
 print("#" .. frame .. ", " .. h .. "h " .. m .. "m " .. s .. "s")
 else
 local h, m, s = ticks_to_hms(end_ticks - get_tick_count())
 print(frame .. "/" .. total_frames .. ", " .. h .. "h" .. m .. "m" .. s .. "s/" .. free .. " left")
 end
end

function ticks_to_hms (ticks)
 local secs = (ticks + 500) / 1000 -- round to nearest seconds
 local s = secs % 60
 secs = secs / 60
 local m = secs % 60
 local h = secs / 60
 return h, m, s
end

-- sleep, but using wait_click(); return true if a key was pressed, else false
function next_frame_sleep (frame, start_ticks, ticks_per_frame)
 -- this calculates the number of ticks between now and the time of
 -- the next frame
 local sleep_time = (start_ticks + frame * ticks_per_frame) - get_tick_count()
 if sleep_time < 1 then
 sleep_time = 1
 end
 wait_click(sleep_time)
 return not is_key("no_key")
end

-- delay for the appropriate amount of time, but respond to
-- the display key (allows turning off display to save power)
-- return true if we should exit, else false
function frame_delay (frame, start_ticks, ticks_per_frame)
 -- this returns true while a key has been pressed, and false if
 -- none
 while next_frame_sleep (frame, start_ticks, ticks_per_frame) do
 -- honour the display button
 if is_key("display") then
 click("display")
 end
 -- if set key is pressed, indicate that we should stop
 if is_key("set") then
 return true
 end
 end
 return false
end

-- if the display mode is not the passed mode, click display and return true
-- otherwise return false
function seek_display_mode(mode)
 if get_prop(props.DISPLAY_MODE) == mode then
 return false
 else
 click "display"
 return true
 end
end

-- switch to autofocus mode, pre-focus, then go to manual focus mode
function pre_focus()
 local focused = false
 local try = 1
 -- set focus mode to infinity
 -- set_prop(6, 3)
 while not focused and try <= 5 do
 print("Pre-focus attempt " .. try)
 press("shoot_half")
 sleep(2000)
 if get_prop(18) > 0 then
 focused = true
 -- lock autofocus
 press("left")
 --set_aflock(1)
 end
 release("shoot_half")
 sleep(500)
 try = try + 1
 end
 return focused
end

if focus_at_start then
 if not pre_focus() then
 print "Unable to reach pre-focus"
 end
end

start_ticks = get_tick_count()

ticks_per_frame, total_frames, end_ticks = calculate_parameters(secs_frame, hours, minutes, start_ticks)

frame = 1
original_display_mode = get_prop(props.DISPLAY_MODE)
target_display_mode = 2 -- off

print "Press shutter button to exit"

while endless or frame <= total_frames do
 print_status(frame, total_frames, ticks_per_frame, end_ticks, endless)
 if display_off_frame > 0 and frame >= display_off_frame then
 seek_display_mode(target_display_mode)
 end
 shoot()
 if frame_delay(frame, start_ticks, ticks_per_frame) then
 print "User quit"
 break
 end
 frame = frame + 1
end

-- restore display mode
if display_off_frame > 0 then
 while seek_display_mode(original_display_mode) do
 sleep(1000)
 end
end

-- restore focus mode
set_aflock(0)
| Print article | This entry was posted by Andy on June 3, 2010 at 10:35 pm, and is filed under Photography. Follow any responses to this post through RSS 2.0. Both comments and pings are currently closed. |
Comments are closed.

about 13 years ago
Thanks! It works like a charm.
about 9 years ago
Just want to say this post is still working good in Oct 2015. I’ve just used it to install CHDK on a thrift-store A480 and run LAPSED3.LUA. Thanks!